Get Started!
Replay Music expands on Applian's many years of recording online music. You can record from multiple online sources at the same time without worrying about audio overlap, and your recordings will be tagged with song info, album artwork, and even lyrics.
Launch Replay Music 8, press the Record button, and then visit a high-quality streaming music service. If you are unsure where to go for online music, or if you want to explore new sites, check out the new Guides feature on the left side of the interface.
When music plays, Replay Music will start recording the audio. When the song is over, Replay Music will lookup the song and album information, grab appropriate album artwork, and download the lyrics. It's that simple. Additionally, you can drag & drop your existing music into Replay Music to be "tagged" with song information, album artwork, and lyrics.
Starting a Recording Session
IMPORTANT: When recording, be sure to open Replay Music first, THEN open the music player program or browser you're using.
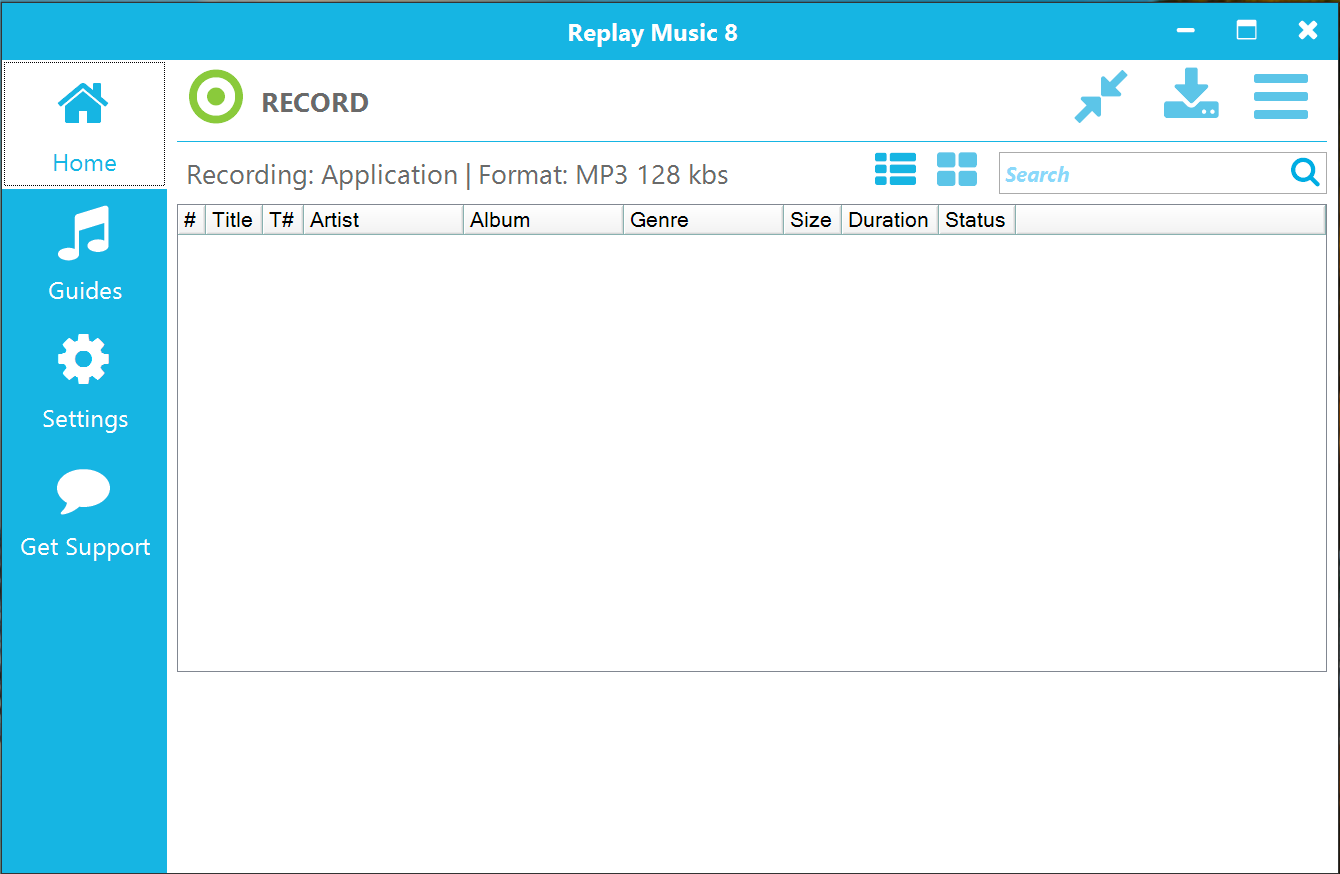
Here's how Replay Music appears when you open it:
To start a recording session:
- Open Replay Music by clicking the Replay Music icon
 on your desktop.
 - In Replay Music , click the RECORD button.
 If you know the artist, album, and genre ahead of time, you will be presented with an option to enter that information at the start of a recording session.
 - Open your browser or music player program. Alternately, click the Guide tab at the left to browse different online music sources.
- Play music in your browser or music player program. Replay Music will save the music, tag it, get album artwork, and get lyrics. If you have chosen so in Settings, the song will be sent to the iTunes or Windows Media Player library.
- After you're done recording, click the STOP button.
 This ends the recording session.
To ensure Replay Music is recording, look for the VU Meter graph moving rapidly at the bottom left of the main screen. This lets you know that Replay Music can "hear" the audio to record. If you do not see movement in the VU Meter, then Replay Music is not detecting any audio. Stop and restart recording. For best results, open Replay Music PRIOR to starting the application that you will be recording from, and make sure the volume is all the way up in the application you are recording from.
The Replay Music Interface

At the top is the toolbar. From here you can start and stop the recording of media. The buttons at the right are for splitting an active recording  , switching to the minimal interface
  , changing the output folder
  , and accessing the main menu
 . Additionally, if you have not registered your copy of Replay Music yet, you will see the shopping cart button
  to do so.
Along the left side of Replay Music there are tabs for:
-
 Your recording listing is shown in the Home tab
 -
 The Guides provide quick links to popular online music services
 -
 Configure Replay Music to your needs in Settings
 -
 Get Support gives ways to get more information on the software
At the bottom of the left hand side is a audio visualizer which is active when a recording is in progress.
Home Tab
The Home screen is broken into three sections.

In the top section below the main toolbar, the active recording method is listed next to Recording:, and Format: displays the sound file type and bitrate being used for the recording. The recording method and format are configurable in Settings, and clicking in this area will take you to the recording settings.
The Search field allows you to locate specific songs that you have recorded - especially useful for very long recording sessions.

In the middle is the listing of recordings. While a recording is active, you will see a new entry appear when audio is detected, and the Size will increment. The Status column will update depending on whether the state is Recording, Tagging, or Complete. The first # column is the order/sequence in which the recording took place, while T# is the tagged track number from album.
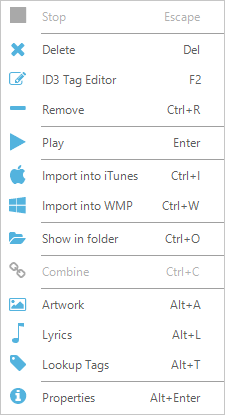
If you right-click on an entry in the recording listing or use the main menu , you will be presented with more actions:
Stop = Stops the current recording session
Delete = Delete selected recording(s) from computer
ID3 Tag Editor = Open the ID3 Tag Editor for the selected recordings
Remove = Remove file from recording list (This action leaves file in the output folder)
Play = Play selected recording
Import into iTunes = Import selected recording(s) into iTunes library if installed
Import into WMP = Import selected recording(s) into Windows Media Player library
Show in folder = Show selected file in Windows File Explorer
Combine = Combine multiple selected files into a single file
Artwork = Show retrieved album artwork in the Properties Window
Lyrics = Show the song lyrics in the Properties Window
Lookup Tags = Lookup ID3 tags (artist, song, album, etc) for selected song(s)
Properties = Open the recording properties window
Additionally, the Main Menu has options for Importing songs into Replay Music, opening the Help to the support website, and Quitting the program.
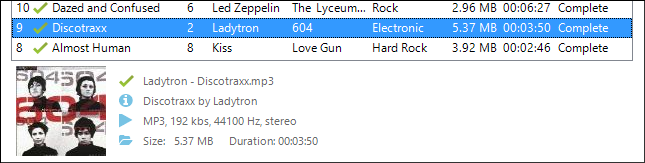
At the bottom is recording information when an item is selected from the recording list. Clicking the ![]() info circle icon will display the detailed recording properties window. Clicking the
info circle icon will display the detailed recording properties window. Clicking the ![]() play triangle icon will launch your media player. Clicking the
play triangle icon will launch your media player. Clicking the ![]() folder icon will open up the location at which the recording was saved on your computer.
folder icon will open up the location at which the recording was saved on your computer.

If you are still in Trial mode (i.e. you have not purchased a license yet), you will see how many credits you have left at the bottom right. While in Trial mode, you can save and tag 25 recordings, after which you will need to purchase a license to keep using the software. Simply click the shopping cart button to begin the registration process.
Guides Tab
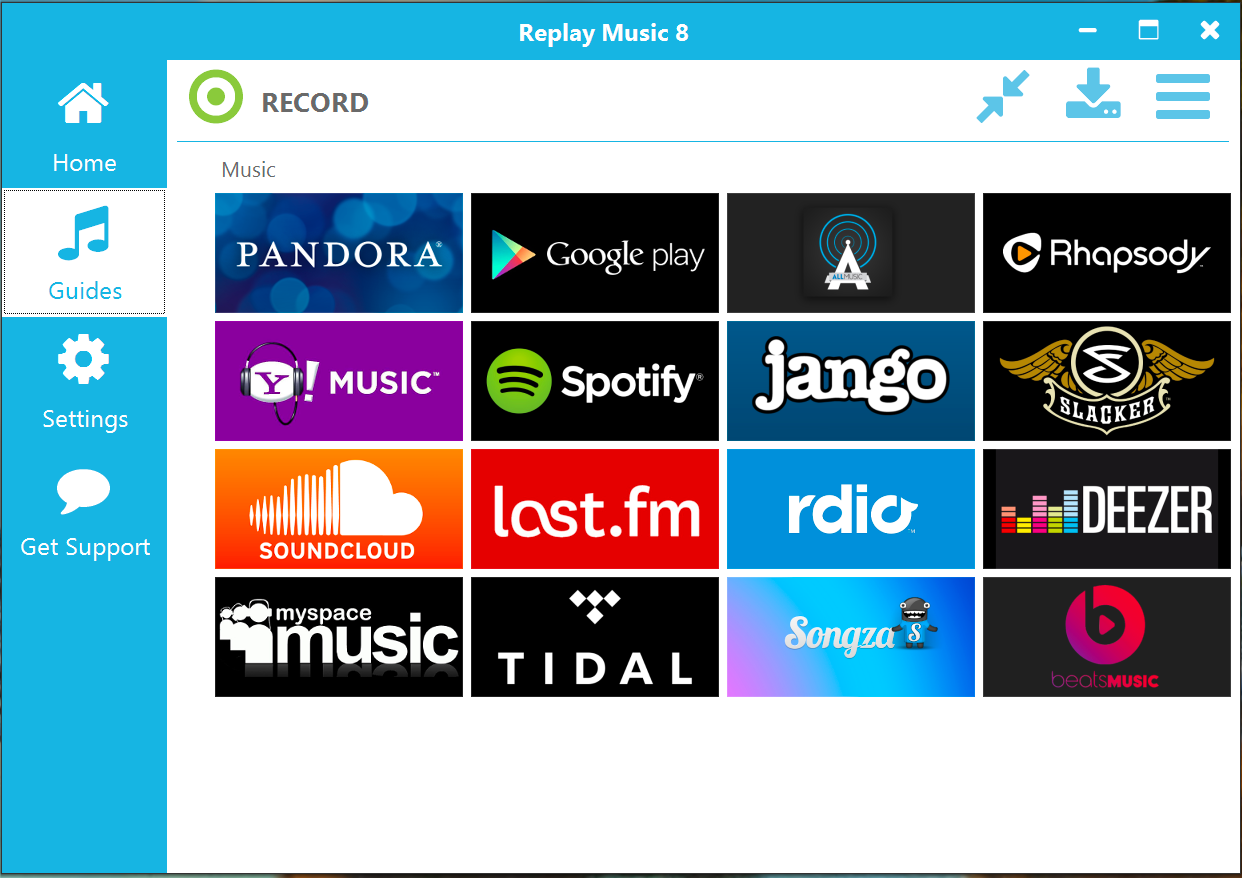
The Guides provides a convenient place to obtain your favorite music and discover new music. Multiple websites for both online music and radio are listed for you to peruse by scrolling left and right. The zoom out button  at the lower right lets you switch between the music and radio guides. You are not limited to these sites as Replay Music will record audio from your browser and other audio applications. Please see Recording Settings below for more information.
Settings Tab

Settings are separated into 5 categories, running just below the Settings header in the main interface. If you want to return to the default settings, as shown below, press the curved arrow icon  at the top right.
-
Personalization
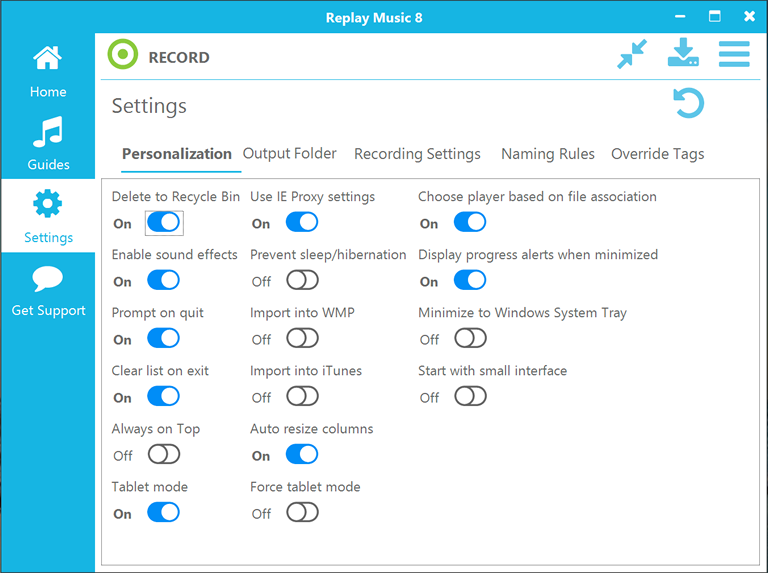
- Delete to Recycle Bin: When On, deleted files will go to Recycle Bin as opposed to being immediately deleted from your computer.
- Enable sound effects: When On, tones will sound when recording is turned on and off. In Stereo Mix mode, recommended setting is Off.
- Prompt on quit: When On, you will be notified when RM7 is closing and still actively in recording mode.
- Clear list on exit: When On, the recording list will be cleared when RM7 is closed. No files will be deleted.
- Always on Top: When On, RM7 will attempt to stay above all other programs running on your screen.
- Use IE Proxy settings: When On, RM7 will use any active Proxy settings.
-
Start with small interface: When On, RM7 will launch in Small Interface mode - normally activated with the Small Interface button.
- Import into WMP: When On, completed recordings will be copied to the Windows Media Player Library.
- Import into iTunes: When On, completed recordings will be copied to the iTunes Library.
- Auto resize columnsWhen On, width of columns on Home listing will adjust to fit the tagged information. Manually changing column width will disable this.
- Choose player based on file association: When On, pressing play will use your default media player.
- Display progress alerts when minimized: When On and RM7 is minimized, a popup will appear at the lower right of your screen for each active recording.
- Minimize to Windows System Tray: When On, minimizing RM7 will send it to the System Tray as opposed to the Task Tray.
- Prevent sleep/hibernation: When On, RM7 will prevent your computer from going to sleep so that it can continue to record.
-
Output Folder
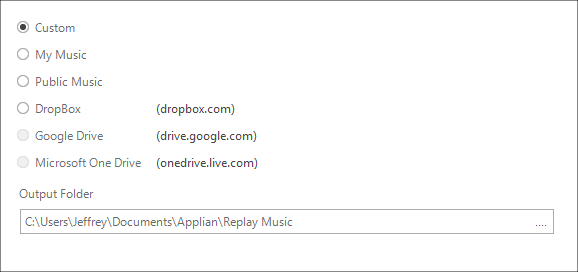
These settings allow you to change the storage location for your recordings. Recordings can be stored locally or on cloud services if you have them enabled. Links are provided for common cloud services. You can also manually change the Output Folder location by typing in the Output Folder field, clicking the "..." at the end of the field, or by clicking the Output Folder icon
in the main toolbar. -
Recording Settings
-
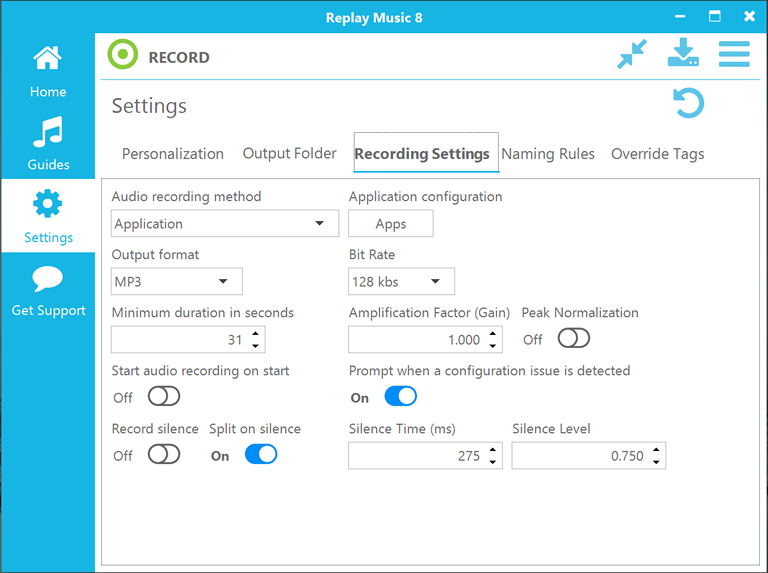
Audio recording method:
- Application: The recommended setting, Replay Music will pull audio out of applications. This prevents your recordings from getting interference from other audio which might be playing on your computer, such as system sounds. Application configuration will let you select which programs Replay Music can grab audio from. Windows 8 users will need to have Secure Boot disabled in their UEFI BIOS to use this mode. Instructions here.
- Device: In this setting, Replay Music can record from external devices such as Line In or microphones. Choose a device in the activated Audio Device menu.
- Stereo Mix (What you hear): Replay Music will record everything that you hear. Increasing the Buffer (ms) value will decrease CPU load. You will want to have your speaker volume turned up to get the best recording.
- Output format: Choose between FLAC, M4A, MP3 (constant bit rate), MP3 VBR (variable bit rate), OGG Vorbis, WAV, and WMA.
- Bit Rate: Choose the audio bitrate to record at. Higher values will result in better sounding recordings and larger file sizes, but most online music is not higher than 128 kbs. Note that M4A uses a variable bit rate, which will depend on the quality of the audio being recorded.
- Minimum duration in seconds: Recordings shorter than this will be discarded. This often will prevent advertisements from being saved.
- Amplification Factor (Gain): Increasing the Gain will increase the volume of the saved recording. Raising this too high might result in audio clipping.
- Peak Normalization: If ON, the recording will be processed to increase the overall volume such that the loudest part is at 0 dBFS.
- Start audio recording on start: When On, Replay Music will immediately start recording when the program is launched.
- Prompt when a configuration issue is detected: Replay Music will check various system parameters when launching to make sure necessary system settings have not changed.
- Record silence: When On, periods of silence, as determined by Silence Level will be saved to the audio file.
- Split on silence: When On, recording sessions will be automatically split when silence is observed, typically between songs.
- Silence Time (ms): Minimum duration of silence needed before a split is triggered.
- Silence Level: Audio level between 0 and 100 below which is considered silence. The default, 0.75, was tuned for a variety of music genres.
-
Audio recording method:
-
Naming Rules
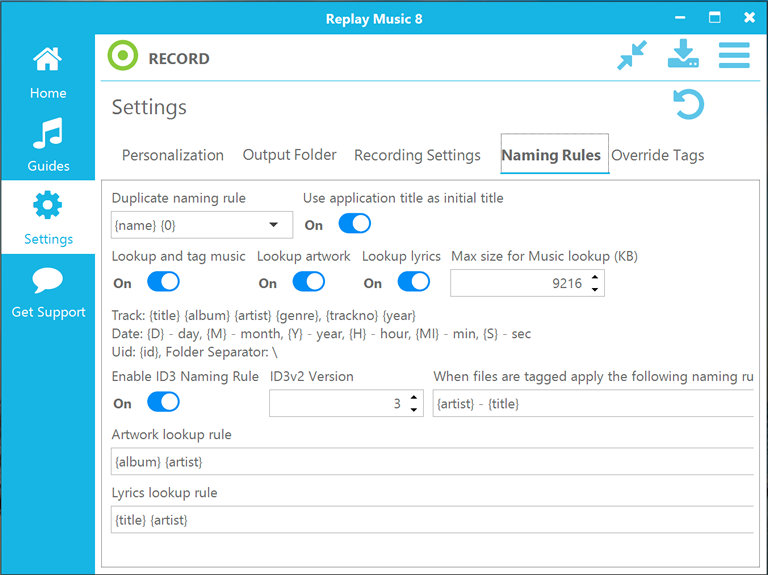
Replay Music uses a curly bracketed (aka braces) shorthand for naming files. This shorthand allows for easy naming of recordings based on a series of rules.
Track: {title} {album} {artist} {genre} {trackno} {year}
Date of the recording: {D} - day, {M} - month, {Y} - year, {H} - hour, {MI} - minute, {S} - second
Uid: {id} (a.k.a. the order in which file was recorded), Folder Separator for creating subfolders: \- Duplicate naming rule: If Replay Music encounters another file in your media folder with the same name, apply this rule to prevent overwriting.
- ID3v2 Version: Windows operating systems don't always recognize the latest ID3 tagging scheme, although iTunes can. If you want to view song tag information in Windows File Explorer, reduce this number.
- Enable ID3 Naming Rule: When On, recordings will be renamed based on the ID3 tag information.
- Lookup and tag music: When On, audio recordings will be checked against an online music database for determining artist, album, song, and other information.
- Lookup artwork: When On, Replay Music will attempt to find appropriate album artwork, based on the lookup rule below.
- Lookup lyrics: When On, Replay Music will attempt to find song lyrics, based on the lookup rule below.
- When files are tagged, apply the following naming rule: Using the listed, bracketed shorthand, files will be renamed based on the shorthand.
- Use application title as initial title: If ON, RM7 will attempt to get the title of the recording from the window of the audio source. If OFF, you can choose an initial title. Often, using a date shorthand such as {Y}{M}{D}{H}{MI}{S} is convenient.
- Artwork lookup rule: Album artwork will be searched for based on the given shorthand.
- Lyrics lookup rule: Song lyrics will be looked up based on the given shorthand.
So, if you wanted a tagged file to be named by album, artist, and then title with underscores between, you might use {album}_{artist}_{title}.
If you wanted to put the tagged file into subfolders, artist first and then album, and include the track number, you could use {artist}\{album}\{trackno}-{title}.
If a recording is not automatically tagged, you might need to manually tag it for the file naming rules to apply.-
Override Tags
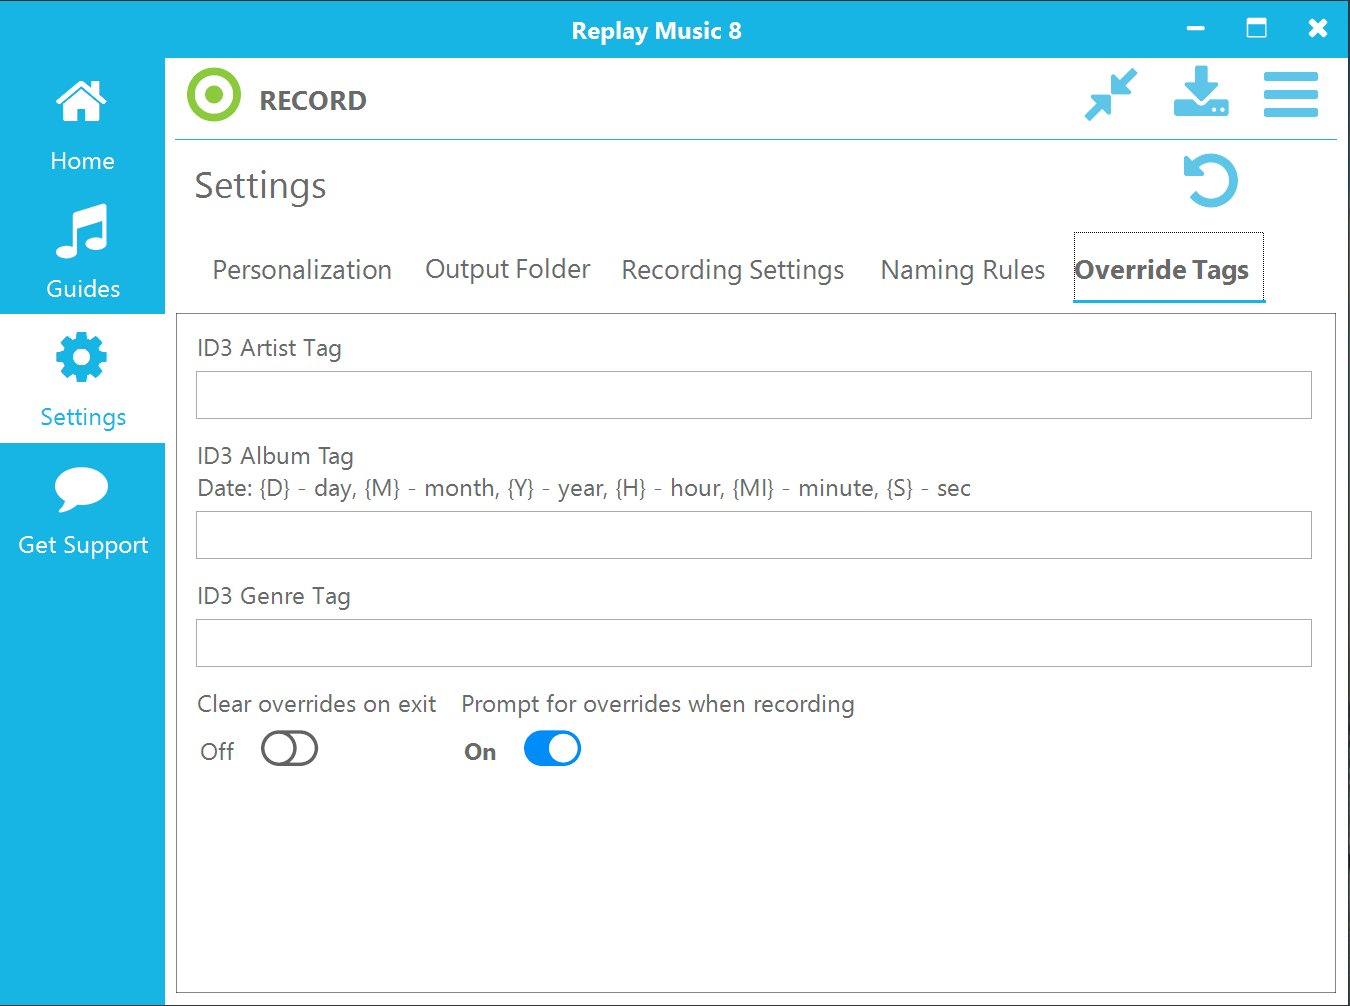
If you are recording an album, and you already know the Artist and Album information, you might want to override the automatic tagging and naming system. In these fields, you can enter information that will be applied to all of the recordings.
- Clear overrides on exit: When On, shutting down Replay Music will clear the override artist, album, and genre settings.
- Prompt for overrides when recording: When On, pressing the Record button will display a prompt asking if you want to override automatic tagging. This is sometimes useful if you are recording a single album and know the values ahead of time.
Get Support Tab
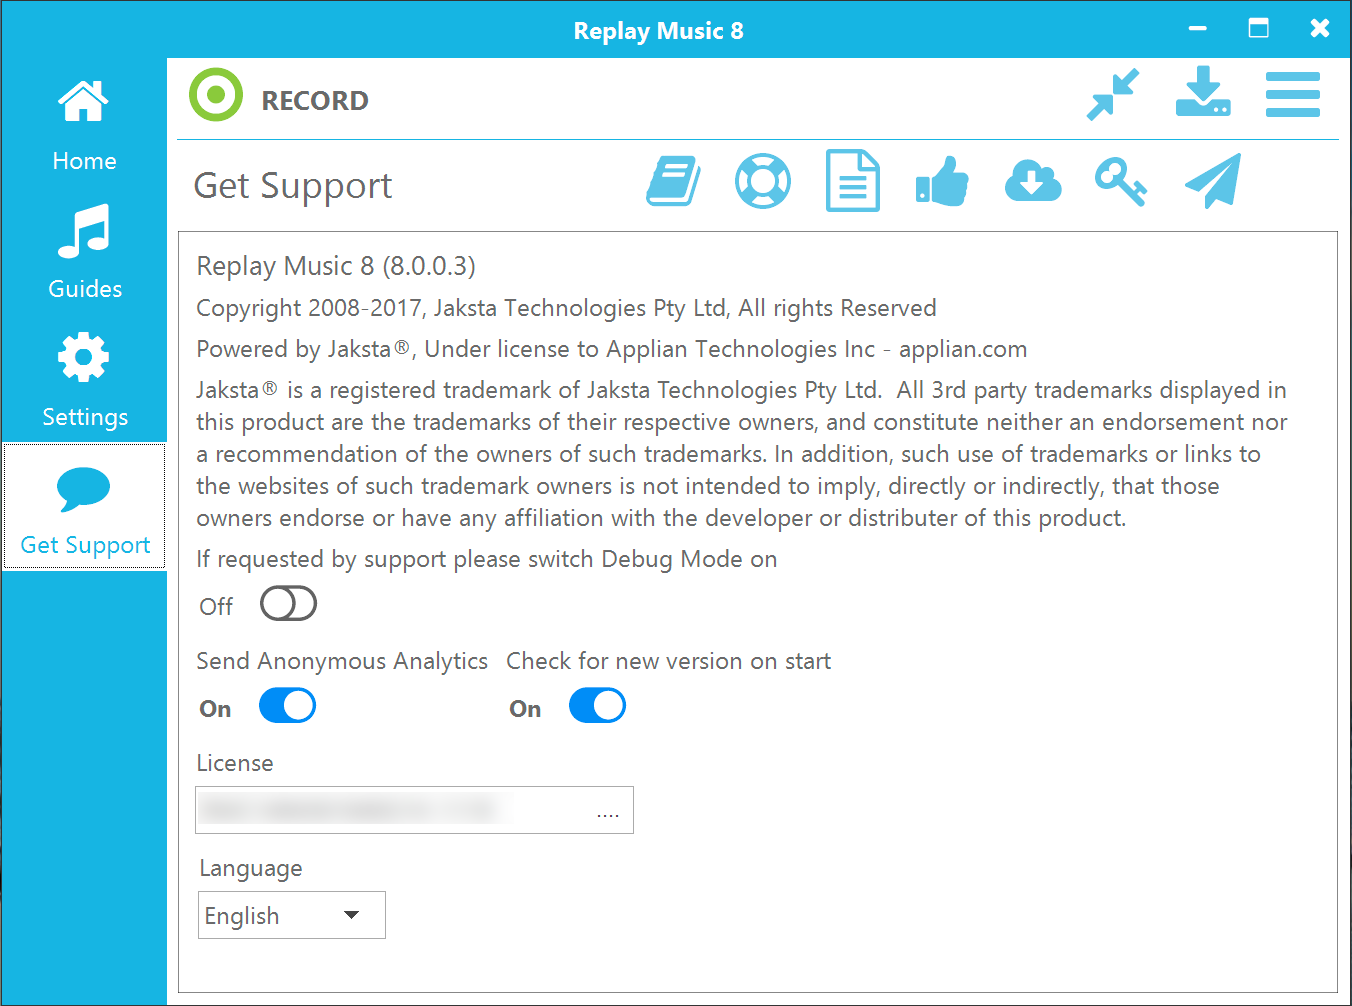
If you are having trouble with Replay Music, we may ask you to turn on "Debug Mode". Turning on this option will save additional information on your usage of Replay Music to help us diagnose problems.
By providing us with anonymous analytics, you can help us understand what parts of Replay Music are used the most, so that we can improve the product.
If you leave the Check for new version on start option on, Replay Music will notify you when a new version of the software is available when you start the program.
Across the top of the Get Support page are icons for other support purposes. You can hover over each on to see a tooltip for what they do.
-
 The User Guide button brings you to this webpage.
 -
 The Support Page button brings you to the main Replay Music support website.
 -
 The EULA button takes you to our website with End User License Agreement information which you agreed to when installing.
 -
 The Acknowledgements button takes you to our website with information on software integrated into Replay Music.
 -
 The New Version button will check to see if there is a new version of Replay Music available.
 -
 The Reset Registration button clears your registration details in case you need to enter a different license code.
 -
 The Send Logs button will package up Replay Music logging data and save it as a ZIP file on your Desktop. This file can then be sent to us for analysis.
Tagging and Track Editing Information
Occasionally a track will not be properly tagged with artist and album information. You can give Replay Music another chance to tag unrecognized tracks.
To query the music database and attempt to tag a track again:
- If the track was from a previous recording session, Replay Music can import it into the track list. Click on the menu button at the top right and select Import. Alternately, you can use the Insert keyboard shortcut or drag & drop music files into Replay Music.
- Once the track or multiple tracks that you want to tag is listed in the main window, make sure it/they are selected, right-click, and select Lookup Tags. If the track is recognizable, Replay Music will tag it, get album artwork, and lyrics. Keep in mind that newly released albums may not yet be in the music database.
You can edit information that is saved along with each recorded song. This allows you greater control over how songs are labeled, or allows you to properly tag a song that is unrecognized by Replay Music. You can edit tracks one at a time, or several at once.
To view and manually edit track information:
- Select one or more songs to edit.
- Use the top, right Main Menu button or Right click and choose ID3 Tag Editor from the menu options.
- The ID3 Tag Editor window appears:
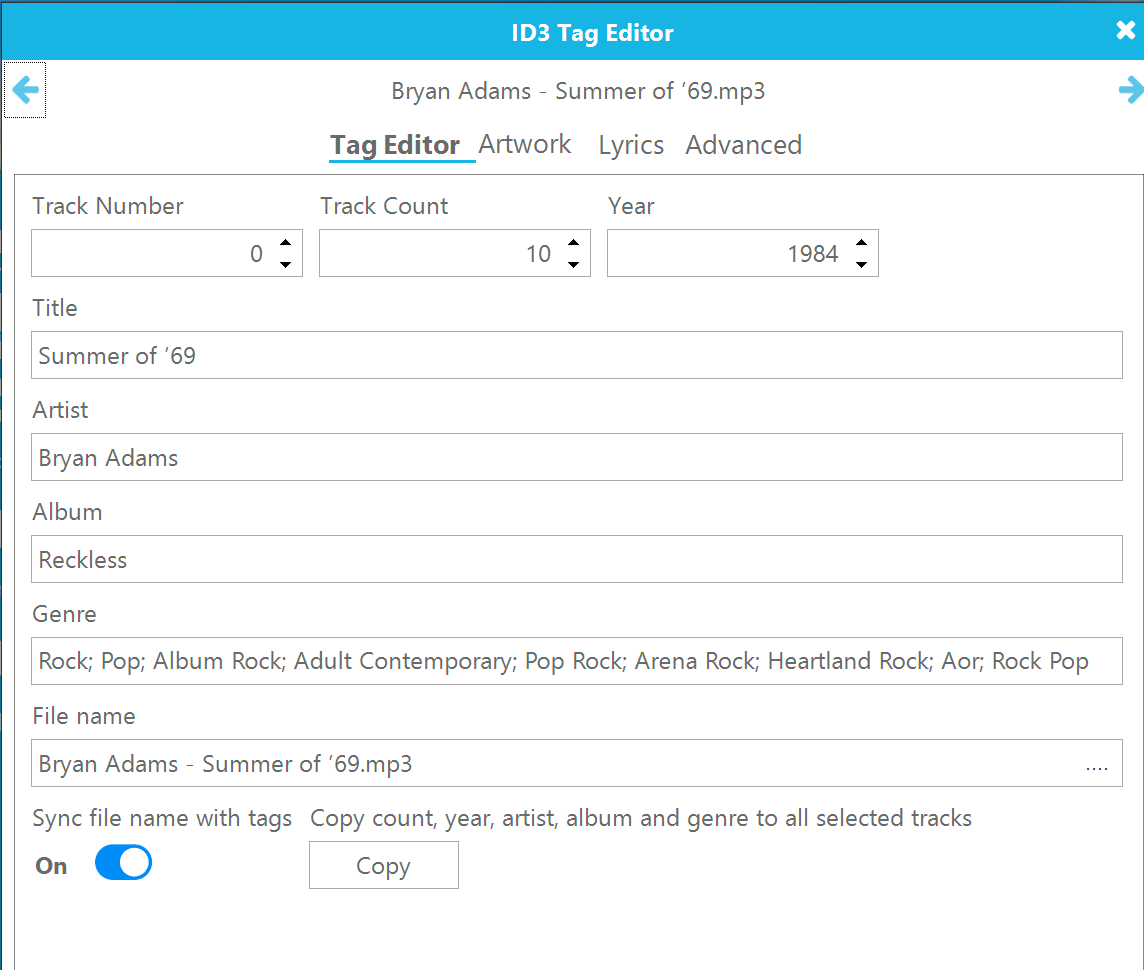
- You can navigate between songs by pressing the left and right arrows at the top sides, respectively. Change the song information as you see fit. If multiple files are selected, pressing the Copy button will apply the artist, album, genre, year, and track count to the whole selection, which is convenient for editing a whole album of recordings. If Sync file name with tagsis On then the file will be renamed based on preferences in Settings: Naming Rules.
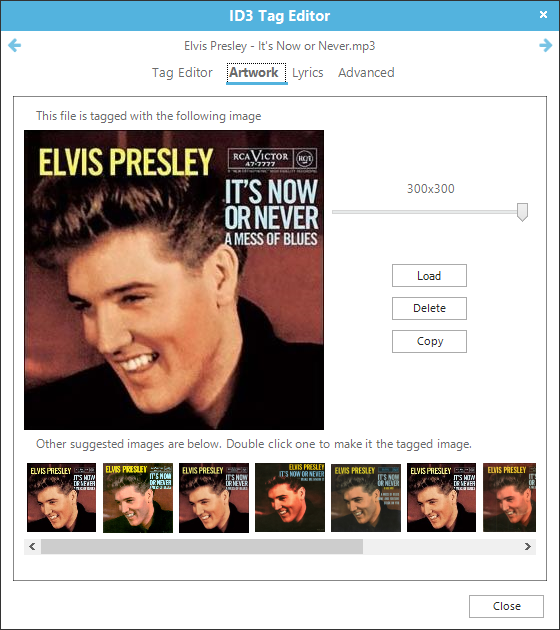
- Click the Artwork tab see the identified album artwork. Album artwork lookup is controlled in Settings. If you don't like the chosen artwork, you can select from other choices at the bottom. If none is found, you can press Load to attach your own. If multiple files are selected, pressing the Copy button will apply the artwork to the whole selection.
- The Lyrics tab will let you view downloaded lyrics for the song. If incorrect lyrics were found, you can search for alternate lyrics in the bottom search field.
- The Advanced tab provides more detailed information on the song which was found during the ID3 tag lookup.
Combining Tracks into a Single Recording
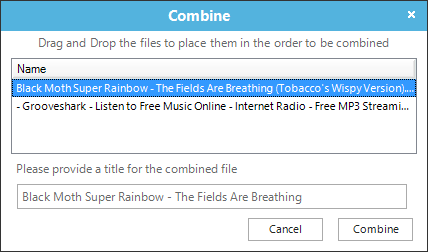
Sometimes, for dramatic effect, songs will have pauses or periods of silence in them that are longer than the Silence Timein Recording Settings. If a song has been unintentionally split, the multiple parts can be recombined. Select the fragmented files, right-click, and select Combine. The Combine interface will open. Place the fragments in the appropriate order, give the new combined recording a name, and press Combine. The combined recording will appear in the Replay Music recording listing.
Recording External Sources
You can also use Replay Music to record LP's or cassette tapes to your computer. Here's how:
- Hook your external audio device to the line-in or mic port on your PC.
- In Replay Music's Settings, change the Audio recording method to Device and choose the appropriate device.
- Click Record, and play your external audio device. Replay Music will record the audio as it plays.
Keyboard Shortcuts
Alt + R = Start or Stop recording
Alt + S = Split recording
Del = Delete selected recording(s) from computer
F2 = Open the ID3 Tag Editor
Enter = Play selected recording
Ctrl + I = Import selected recording(s) into iTunes library
Ctrl + W = Import selected recording(s) into Windows Media Player library
Ctrl + O = Show selected file in Windows File Explorer
Ctrl + C = Combine multiple selected files
Alt + A = Show the album artwork in the Properties Window
Alt + L = Show the song lyrics in the Properties Window
Alt + T = Lookup ID3 tags (artist, song, album, etc) for selected song(s)
Alt + Enter = Open the recording properties window
Alt + I = Open file browser to Import songs into Replay Music
F1 = Open web browser to the Replay Music support page
Alt + F4 = Quit
Disabling Secure Boot on Windows 8.1 Systems
The Application recording mode requires Secure Boot to be disabled on Windows 8 systems. The benefit of the Applicationrecording mode is that each audio source can be isolated, providing a clean recording. You can still recording in Stereo Mixmode without disabling Secure Boot, but then the recordings might overlap with other audio playing on your computer, such as system sounds. You will need to be careful to turn off system sounds and not have any other audio play during a recording.
You might want to print out these instructions or have them open on a mobile/secondary device since disabling Secure Boot involves restarting your computer. You might also want to bookmark this page to return to after disabling Secure Boot.
- Press the Windows key + C, or (if you have a touchscreen) swipe in from the right edge of the screen to open your Charms.
- Click Settings.
- Click Change PC Settings.
- In PC Settings, select Update and Recovery.
- In the Update and Recovery screen, click Recovery at the left.
- Under Advanced Startup, click Restart now. The system will restart and show the Windows 8 boot menu.
- In the boot menu, select Troubleshoot.
- In the Troubleshoot menu, select Advanced options.
- In the Advanced options menu, select UEFI Firmware Settings.
- Click Restart button to boot into UEFI BIOS Setup screen.
- Each manufacturer lays out the BIOS differently. Look through the BIOS settings and disable Secure Boot. Save settings and exit.
Here is a video walking through the steps: http://www.youtube.com/watch?v=XZcYbxOcPV0
Once Secure Boot is turned off, you will be able to use the Applications recording method to get clean recordings.
Legal Notices
The End User License Agreement can be reread here.
Song recognition uses technology licensed from Rovi Corporation and AMG. The license agreement is here.